How to convert YouTube to iPad MP4 files on Mac?
"I know that iPad's browser does not support flash video. So it sounds we can not watch YouTube videos on iPad right? Is there any program can help me put YouTube videos on iPad, thanks a lot?" As we know, iPad can only read M4V, MOV, and MP4 you need to convert YouTube video to iPad compatible format that iPad can easily work with. To do this, you need our iMacsoft iPad Video Converter for Mac. If you already download this iPad Video Converter for your Mac, then just follow the step by step guide on how to convert YouTube video to iPad MP4 files on Mac OS.1: Load YouTube videos
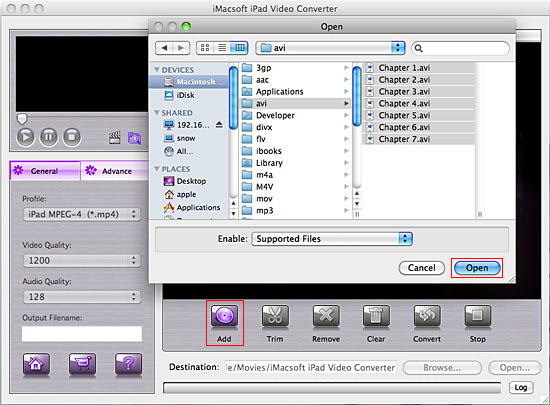
Free download iMacsoft iPad Video Converter for Mac (Intel version, PowerPC version) and get the tiral one. Press "Add" button or choose "File->Add..." option in the top menu, you can select YouTube video files from Mac in the pop-up dialog window box. When it is done, press "Open" button to load. If you buy this YouTube to iPad MP4 converter, lots of functions await you to have a try without any limitations.

2: Output iPad format
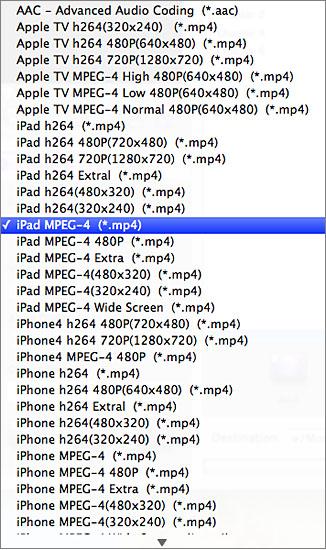
Select the YouTube video files you loaded in the list, and click "Profile" drop-down list in the "General" panel, choose "iPad MPEG-4 (*.mp4)" option for output iPad MP4 video files. Or you can flexibly set different iPad video files format refer to iPad series. The software allows setting different output formats according to different files.
Select the YouTube video files you loaded in the list, and click "Profile" drop-down list in the "General" panel, choose "iPad MPEG-4 (*.mp4)" option for output iPad MP4 video files. Or you can flexibly set different iPad video files format refer to iPad series. The software allows setting different output formats according to different files.
3: Adjust some parameters
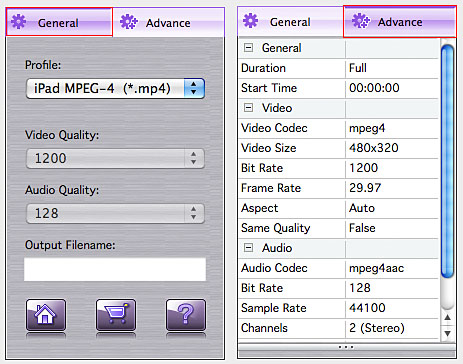
1)After selecting certain output format, you can choose "General" tab on the right top which will show its general standard. You may set "Video Quality", "Audio Quality", "Output filename" by clicking "General" button.
2)After that, you can also choose "Advance" tab on the right column which will show its advanced standard. You may set "Start Time", "Video Size", "Bit Rate" by clicking certain settings.
4: Convert YouTube to iPad MP4
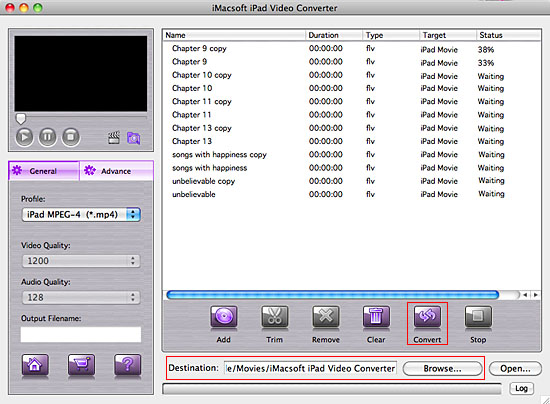
Clicking the "Browse..." button and select the output destination for saving in the pop-up window or directly enter a path of Mac HD, in "Destination" drop down list box, and then select YouTube videos in the file list you want to convert and press "Convert" button to start YouTube video to iPad MP4 converting. You can view converting process in the progress bar.
Clicking the "Browse..." button and select the output destination for saving in the pop-up window or directly enter a path of Mac HD, in "Destination" drop down list box, and then select YouTube videos in the file list you want to convert and press "Convert" button to start YouTube video to iPad MP4 converting. You can view converting process in the progress bar.
Tips: How to put MP4 videos to iPad?
(1) Please click "Open" button in the software interface after the conversion is complete.
(2) Locate the converted files in the destination folder and add those video files to iTunes library.(support iTunes 10)
(3) Connect iPad to Mac, you will see the video files have already shown in iTunes library of "Movies" option. When your iPad is successfully recognised by iTunes, all iPad items are displayed in iTunes list. Click iPad icon, and choose "Movies" option to select several or whole video files you want to sync. After everything is finished, press "Sync" button to complete video to iPad transferring.
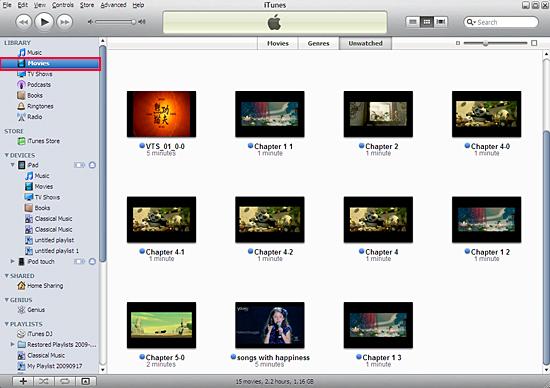
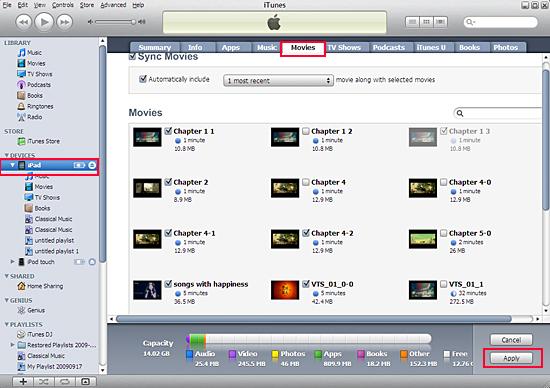
Without iTunes, you can also transfer these converted files to iPad easily with our product--iMacsoft iPod to Mac Transfer, iPhone to Mac Transfer or iPad to Mac Transfer software.
Tips: How to trim FLV video segment for output?
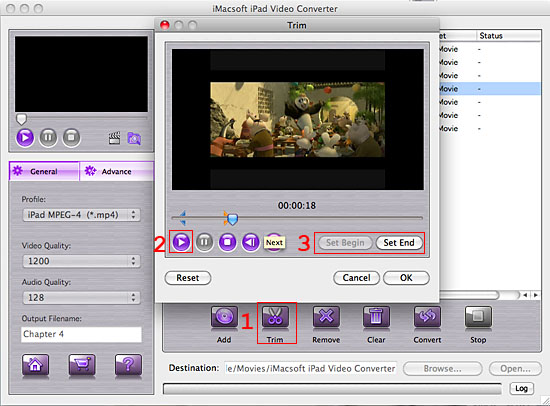
Select one FLV video in the file list, click "Trim" button in the toolbar to open "Trim" window. You can clip the original video into several parts, then convert and output them separately or as a whole one. Set start point and end point, you get the segment you want to convert and output. If you don't satisfy with the clips you trimmed, please press "Reset" button to set accurate start and end point again.
Tips: How to take screenshot when previewing FLV video?
You are capable to make a stylish album using the snapshots taken from the video with this software. Click "Capture Frame" button at the left top of the main interface to take snapshot when playing the video and save as BMP, click "Open Snapshot Folder" to check the snapshot. You can also define the destination in your hard disk to save the snapshots.
You are capable to make a stylish album using the snapshots taken from the video with this software. Click "Capture Frame" button at the left top of the main interface to take snapshot when playing the video and save as BMP, click "Open Snapshot Folder" to check the snapshot. You can also define the destination in your hard disk to save the snapshots.

|
Hot Tags: |
||||
Ready to try or buy?
-
- iPod to Mac Transfer

- iPhone to Mac Transfer

- iPad to Mac Transfer

- iPhone Ringtone Maker for Mac

- iPhone SMS to Mac Transfer

- iPhone Contact to Mac Transfer
- iPhone Call List to Mac Transfer
- iPhone iBooks to Mac Transfer

- iPhone Photo to Mac Transfer
- DVD to iPod Converter for Mac
- DVD to iPhone Converter for Mac
- DVD to iPad Converter for Mac

- iPod Video Converter for Mac
- iPhone Video Converter for Mac
- iPad Video Converter for Mac
- iPod to Mac Transfer
-
- Mac DVD Toolkit

- iPod Mate for Mac

- iPhone Mate for Mac

- iPad Mate for Mac

- DVD Ripper Suite for Mac
- DVD Maker Suite for Mac
- DVD to iPod Suite for Mac
- DVD to iPhone Suite for Mac
- DVD to iPad Suite for Mac
- DVD to MP4 Suite for Mac
- DVD to Apple TV Suite for Mac
- DVD Audio Ripper Suite for Mac
- DVD to FLV Suite for Mac
- DVD to PSP Suite for Mac
- Mac DVD Toolkit


