How to convert video DivX to DVD disc?
iMacsoft DivX to DVD Converter is powerful yet simple to use program that can convert DivX/XviD files to a DVD video disc which you can view using your standalone DVD player. What makes it different than other competitors in the same program category is that it's by far the most simple one as well as the faster one.Also its big advantage is that it's free, so you can just download the full version from our downloads section here. And the iMacsoft DivX to DVD Converter has decided to add many new features and make DivX to DVD a commercial program. However this free version is still available and will always be, so feel free to try it and see if it covers your needs. See more details as below:
Step1: Load DivX
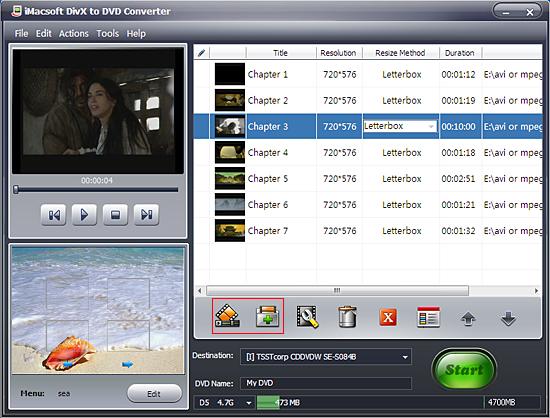
Free download and run DivX to DVD Converter and click "Add Video File" button on the toolbar or click "File > Add Video File(s)…" option from the main menu to load the video files you want to burn. Or directly drag DivX video files into iMacsoft DivX to DVD Converter inferface.
Tip: Click "File > Add Video Folder…" option from the main menu or press "Add Video Folder" button to choose a folder and load all DivX video files in this folder into the file list.
Step2: Select output mode in "Destination"
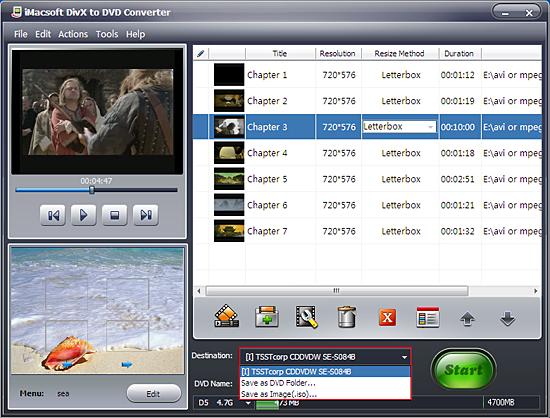
Insert an empty DVD disc, and choose the disc you insert from the "Destination" drop-down list for OK. And enter a name in the "DVD Name" textbox as the output DVD name.
Insert an empty DVD disc, and choose the disc you insert from the "Destination" drop-down list for OK. And enter a name in the "DVD Name" textbox as the output DVD name.
Step3: Start DivX to DVD converting
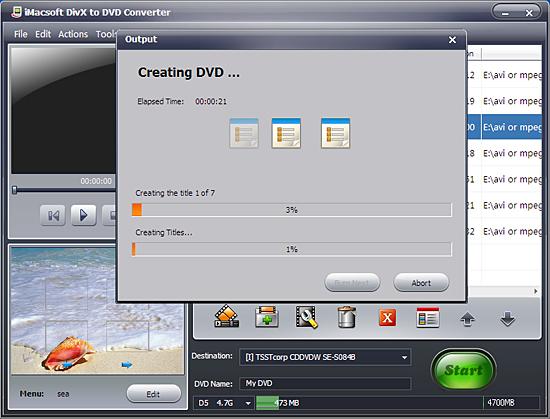
Select the disc type you need and click "Start Burn" button at the right bottom of the file list to start DivX to DVD converting.
Select the disc type you need and click "Start Burn" button at the right bottom of the file list to start DivX to DVD converting.
Create DVD menu
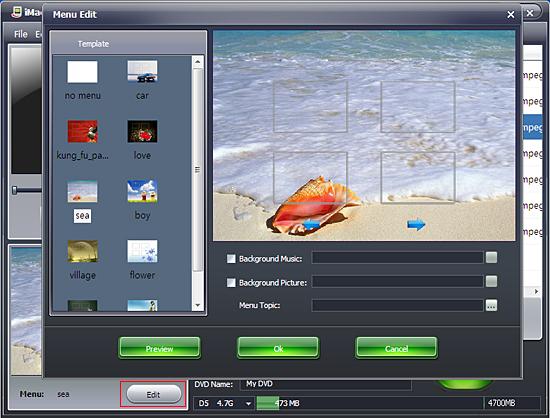
Click the "Edit" button button and choose one certain template for DVD menu in the bottom-left corner of the main interface. When you enter the next to the "Menu Edit" window, plenty of templates are waitting for you to choose. And you can also add background music/picture, title and menu topic to your menu.
Click the "Edit" button button and choose one certain template for DVD menu in the bottom-left corner of the main interface. When you enter the next to the "Menu Edit" window, plenty of templates are waitting for you to choose. And you can also add background music/picture, title and menu topic to your menu.
Trim video for DVD burning
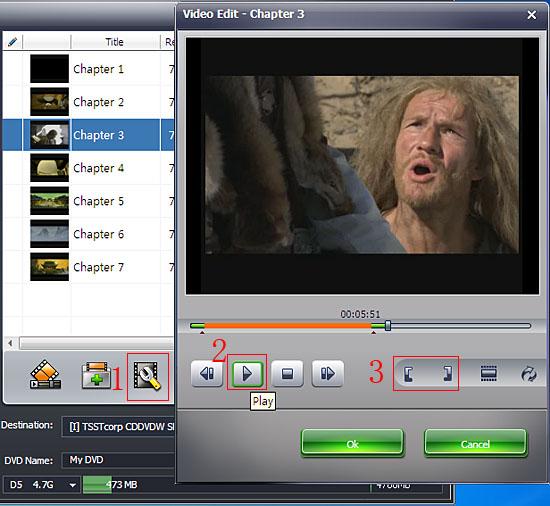
Step 1: Select a video file from the File List, and then click the "Trim" button on the Toolbar to open the "Trim Video" window.
Step 2: You can clip a segment in one of two ways: a) Click the "Play" button to play the video. Click the "Set Start " button at any time to set the start point for the segment; set the segment end point by clicking "Set End " at any time. A new segment will then be added to the Segment List below.
b) Alternatively, scroll the video to the start point of the segment you want to clip, and then click "Set Start Point". Next, scroll the video to the end point of the segment, and then click "Set End Point". A new segment will then be added to the Segment List below.
Step 3: Click the "Reset" button above the Segment List, and then repeat Step 2 to get a new segment. Repeat this process to extract as many segments as you want.
|
Hot Tags: |
||||
Ready to try or buy?
 13.90 MB
 $22.oo
 -
- iPod to Mac Transfer

- iPhone to Mac Transfer

- iPad to Mac Transfer

- iPhone Ringtone Maker for Mac

- iPhone SMS to Mac Transfer

- iPhone Contact to Mac Transfer
- iPhone Call List to Mac Transfer
- iPhone iBooks to Mac Transfer

- iPhone Photo to Mac Transfer
- DVD to iPod Converter for Mac
- DVD to iPhone Converter for Mac
- DVD to iPad Converter for Mac

- iPod Video Converter for Mac
- iPhone Video Converter for Mac
- iPad Video Converter for Mac
- iPod to Mac Transfer
-
- Mac DVD Toolkit

- iPod Mate for Mac

- iPhone Mate for Mac

- iPad Mate for Mac

- DVD Ripper Suite for Mac
- DVD Maker Suite for Mac
- DVD to iPod Suite for Mac
- DVD to iPhone Suite for Mac
- DVD to iPad Suite for Mac
- DVD to MP4 Suite for Mac
- DVD to Apple TV Suite for Mac
- DVD Audio Ripper Suite for Mac
- DVD to FLV Suite for Mac
- DVD to PSP Suite for Mac
- Mac DVD Toolkit


